Table of Contents
ToggleBlog App Backend nodejs project scretch to Advance
First, we need to set up our project. Open up your terminal and create a new folder for your project. Navigate into the folder and run the following command to initialize a new Node.js project:
npm init -y
Next, we need to install some dependencies. Run the following command to install Express (a popular Node.js web framework), Mongoose (an object data modeling library for MongoDB), and body-parser (a middleware for parsing JSON and URL-encoded data):
npm install express mongoose body-parser
Now that we have our dependencies installed, let’s create our server.js file. In this file, we’ll set up our Express app and define our routes.
Before start blog project you can create file in code editor
nodejs mvc folder structure in detail
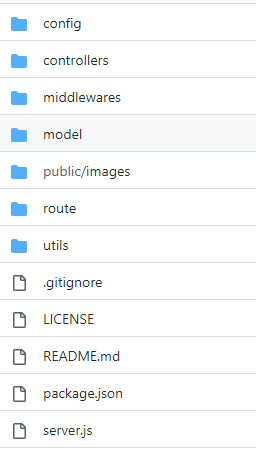
Node.js is a flexible and versatile runtime environment that allows developers to build web applications using JavaScript on both the server-side and the client-side. When it comes to structuring a Node.js web application, there are different approaches and conventions, but the Model-View-Controller (MVC) pattern is a popular and effective way to organize code and separate concerns.
Here is an example of a typical Node.js MVC folder structure:
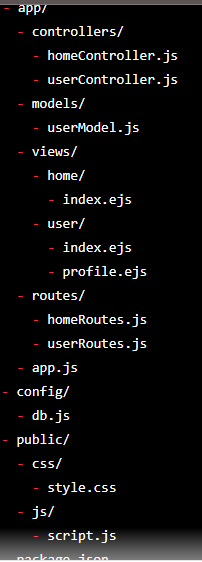
Let's break down each folder and file:
app/: This folder contains the application-specific code.controllers/: This folder contains the controller files that handle user requests and responses. Each controller file defines methods that correspond to different endpoints in the application.models/: This folder contains the model files that represent the application data and business logic. Each model file defines a schema that maps to a database collection or a data source.views/: This folder contains the view files that render HTML templates and display data to the user. The views are organized into subfolders that correspond to different controller actions or pages.routes/: This folder contains the route files that define the URL paths and the middleware functions that handle requests and responses. Each route file maps to a controller file and defines the HTTP methods (e.g. GET, POST, PUT, DELETE) and the URL parameters.app.js: This file is the entry point of the application and defines the middleware functions, the database connection, and the server configuration. It also requires the route files and starts the server.
config/: This folder contains the configuration files that define the environment variables, the database connection options, and other application settings.db.js: This file exports the database connection instance and the schema models.
public/: This folder contains the static files (e.g. CSS, JavaScript, images) that are served to the client. The files are accessible by their URL paths, such as/css/style.cssor/js/script.js.package.json: This file contains the application metadata, the dependencies, the scripts, and other information required to install and run the application.
Note: This is just an example and the actual folder structure may vary depending on the project requirements, the framework or library used, and the personal preferences of the developers. However, the principles of separation of concerns and modularity should be followed to achieve a maintainable and scalable codebase.
Now, Let's Start the Node JS Project Blogs Application
To set up a basic Node.js environment, follow these steps:
Install Node.js: Download and install Node.js from the official website https://nodejs.org/en/download/. Follow the installation instructions for your operating system.
Verify the installation: Open a terminal or command prompt and type
node -v. If Node.js is installed correctly, it will display the version number.Create a project directory: Create a new directory for your Node.js project. You can name it whatever you like.
Initialize a package.json file: In the project directory, run the command
npm initand follow the prompts to create a package.json file. This file will hold information about your project and its dependencies.Install dependencies: Use the command
npm installfollowed by the name of the packages you want to install. For example,npm install expresswill install the Express framework.Create a server file: Create a new file named
server.jsin your project directory. This file will contain the code to start your Node.js server.Write server code: In
server.js, write the code to create a server using a framework like Express. For example:
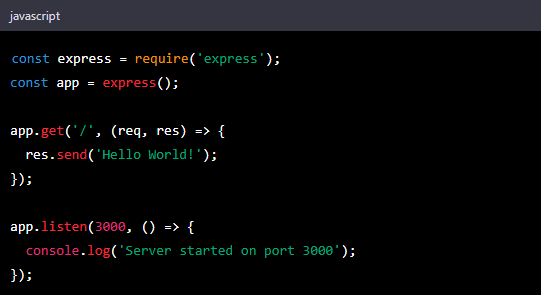
This code creates an Express server that listens on port 3000 and responds to requests to the root path with the message “Hello World!”.
- Start the server: In your terminal or command prompt, navigate to the project directory and run the command
node server.js. This will start the server and you should see the message “Server started on port 3000” in the console.
Congratulations! You now have a basic Node.js environment set up and running.
Click this links and look the project
Calendar 2023
| M | T | W | T | F | S | S |
|---|---|---|---|---|---|---|
| 1 | 2 | 3 | 4 | 5 | 6 | |
| 7 | 8 | 9 | 10 | 11 | 12 | 13 |
| 14 | 15 | 16 | 17 | 18 | 19 | 20 |
| 21 | 22 | 23 | 24 | 25 | 26 | 27 |
| 28 | 29 | 30 | 31 | |||